INSTALLING A WIRE THREAD INSERT
Posted: 18 November 2015Why use a wire thread insert? To repair and or create a high strength, wear resistant, heat resistant threads to a high precision. Wire thread inserts use a helically coiled stanless steal wire that has a diamond shaped cross section. The wire cross-section allows the external portion of the wire to screw into the receiving threads in the housing during installation. The coils of the insert are compressed during installation like a coiled spring, the compressed insert expandes against the walls of the threaded housing, which retains the insert and keeps it from unthreading.
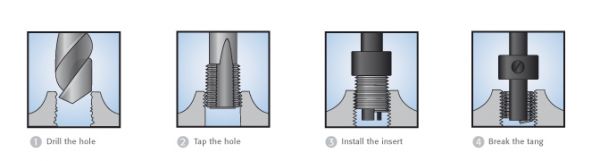
1. Drill out the damaged thread to a sufficient depth to accommodate the wire thread insert and the bolt or screw being used. We always recommend removal of the item you are repairing, and to take extra care as everything follows the drilling. If you are drilling a hard material(i.e. stainless steal) always use a cutting fluid.
2.Tap the hole using a STI (standard thread insert)Tap. These are over sized to allow clearance for the insert. When tapping turn the tap a couple of times to cut then back half a turn to remove any swarf, repeat the process until you have cut a sufficient length needed. If you are tapping a blind hole or non through hole always use a plug tap(also known as a bottoming tap) as this will prevent you cutting down to far. As above if the material is hard always use a cutting fluid.
3.Place the insert on to the insertion tool, tang end goes into the hole first. Wind the insert into the hole, not using to much pressure, until the top coil is 1/4 to 1/2 turn below the top surface.
4. The tang must now be removed to allow full passage of the bolt or screw through the wire thread insert. Place the tang break-off tool squarely on the tang of the insert and then give it a sharp blow. For inserts with diameters bigger than 1/2" or 12mm you can use long nose pliers to remove the tang. Hold the tang with the pliers, do not twist, push down with pressure, the tang will snap off, keep hold of the tang and simply remove it.
Select An Archive
January 2017
December 2016
October 2016
June 2016
May 2016
March 2016
January 2016
December 2015
November 2015
October 2015
September 2015
July 2015
June 2015
May 2015
April 2015
March 2015
January 2015
December 2014
November 2014
October 2014
September 2014